
A Most Basic Drum Chop
The basic Renoise Re-Trigger Technique

I’ve been drawn to jungle and drum and bass production since I started making music as its one of the more difficult and technical styles of music to make and within it, there are so many weird and niche skills to learn to be able to piece a whole tune together.
From the bass science to how to make giant pads, what jazz fusion albums or studios to look for to get the best samples to the famous drum technique and its development as music technology developed, it’s a strange thing I like a bit too much.
I get a huge kick out of finding rare or unused breaks and reverse engineering my favourite jungle tracks to figure out what drums breaks were used and how the drums were processed or how they sampled them to get the sound. I’ve battled gatekeeping strangers on the internet who claimed to know the Secret Break, to scouring internet forum archives while building my own library of breaks to teach myself how to do this through trial and error in the time before there were a million tutorials on youtube.
I’ve chopped my drums with EMU Samplers, with an MPC, in audio within a DAW, with Recycle to chop up breaks and import them into a sampler, with chopping a break in audio and chucking the slices into Logic’s sampler, I’ve used Renoise and I’ve probably tried a few more I cannot remember over time too.
There are so many ways to do it, each with their own perks and utility but Renoise stands out to me as the most unique, maybe the most enjoyable too.
For what is often, or what used to be, a very time consuming and (sadistically) laborious part of making break heavy music, Renoise can be like a time-warp tool where you can very quickly get some breaks flying in all directions, in no time you will be air drumming some impossible to play drum lines.
Alright here we go
This is a basic look at how I chop drums within Renoise.
You can essentially take the basics of what is shown here go bananas with drum chopping to make full tracks.
The audio below was done in Renoise for a promo video for the Loose Joints 2nd Bday party in 2016, its a bit of a caricature of jungle and was mashed together in 20 minutes within Renoise with a ‘classic Jungle’ samplepack for a laugh.
With the tutorial here, you can chop drums like this in no time, well maybe with some practice, but you might be surprised at how easy and quick it is.
For this, you are going to need a very basic understanding of Renoise.
It’s not much but, you will need to know:
- How to load a sample/break
- Basics of editing the sample or cutting it to size within the sample manager
- Dropping notes in the sequencer
- A rough ideas of the hexadecimal counting system
- Maybe the basics of getting around Renoise and its interface, you can probably work this out as you go
You DO NOT need a midi keyboard or any musical background or training.
These should only take a few minutes to learn and you can probably get by without them but it’ll be handy to know.
Using Renoise is easy to use once you get these basics down and there are a tonne of tutorials online - Renoise Tutorial homepage can be found here
Don’t let the look of the program intimidate you, it’s heaps of fun to work with once it all clicks, it looks far worse than it is.
You can download the Renoise Demo here, there are a few restrictions like you cannot export as wav and some internal sample bouncing but its more than enough to have a jam.
The full licence was about $110 AUD from memory, not too bad at all.
If you’d like to read more about Tracker’s, I’ve written about them here.
This is a very basic tutorial or example of one way you can chop breaks, there is no right or wrong way to do it.
I’ve set this up so you should be able to copy what I’ve done to get the break going. I’ve not gone into details about how each of the FX or commands works in full but once you have some drums going, you can search online or through the Renoise site to learn about the full functionality of each command.
Let’s start with maybe the easiest, most common and and fun breaks to chop.
Lyn Collins - Think (About It)
You’ve probably got it in a sample pack, if not, you can find it quite easily and for free, there should be 3 or 4 breaks from this one song, you will surely have heard it in songs a million times.
To start lets just take one of the breaks from the track, we just need 1 Bar for now, it should be 16 steps within the Renoise sequencer once synced.
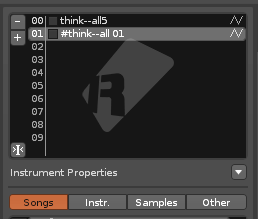
You can find the sample through your finder on the computer or within Renoise’s sample finder and add it to your samples window in the very top right.
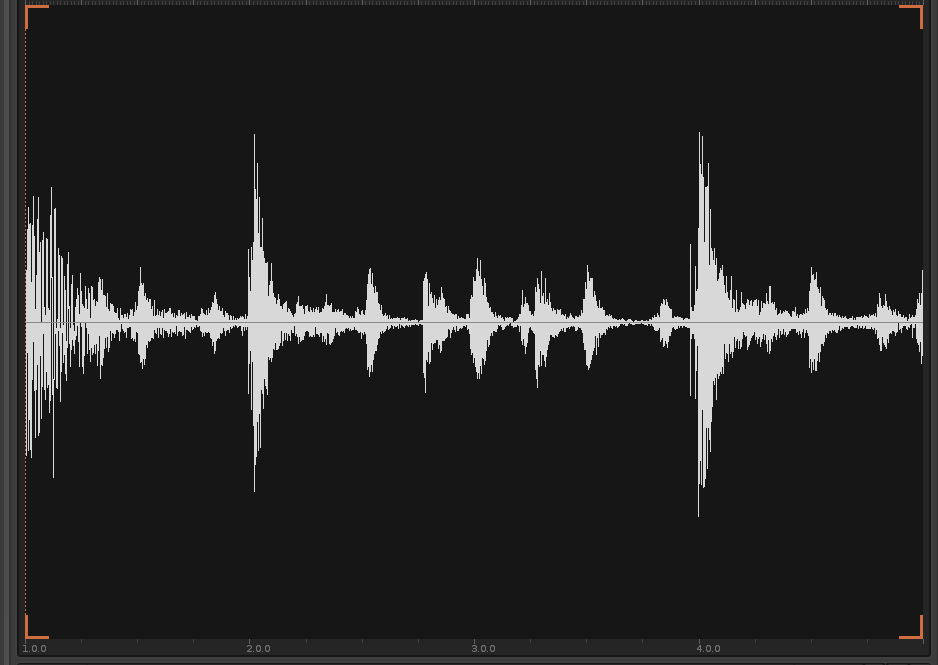
If you double click on the sample in the top right corner sample list..
It should open the Sample Manager window and look something like this. If there is silence at the end or beginning of the sample, you can highlight the area and delete it.
If there is a click at the start or end of the loop, you can fade it in or out by highlighting the area and right click and selecting the fade in or out.
And lets tick the BeatSync box on the left hand side and you want it to be set at 16 (for longer breaks you increase this to 32, 64 etc)
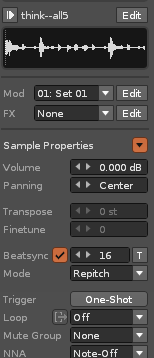
This will sync your loop to the BPM of the track, if you speed up the song, you will hear your sample speed up and stay perfectly in time.
The Mode, is a newly added update which lets you keep the pitch of your sample while retaining the sync, so you can play it across the keyboard melodically, samples can get crunchy and metallic (especially if you are working with musical samples) but for now, lets leave it at Repitch which is the default.
To get out of the sample window, click EDIT in the top left to go back to the Sequencer and the sample is ready to be sequenced.
You can press the keys on the computer keyboard to preview the sample or break.
As its synced, you should only hear the sample playing at the tempo of the song and no other pitch.
Within Renoise you can chop you sample into sections like you might in a traditional DAW but Trackers have the ability to trigger a sample from different points within your sample with some simple commands, this is what we are going to look at.
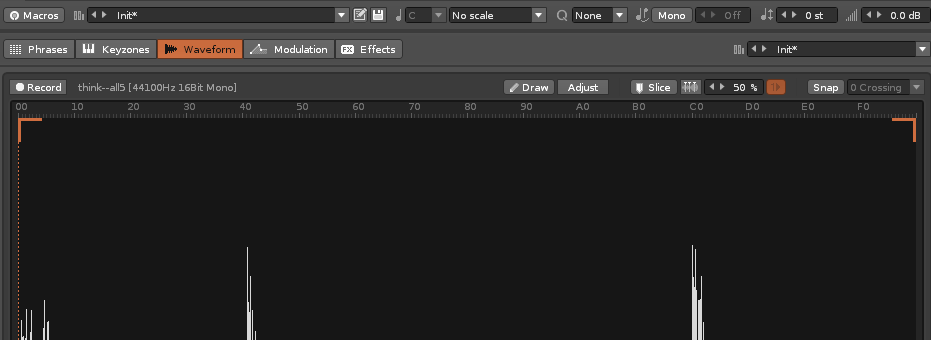
Up the top of the sample you can see a bar with the hexadecimal counting numbers from 00-F0.
These are what we will use as reference to trigger the break from different points (eg from the snare, shuffle, kick, hat etc).
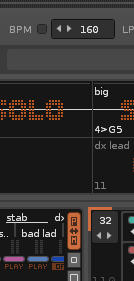
I’ve set the BPM to 160 and set the pattern length to 32 to keep this short and simple.
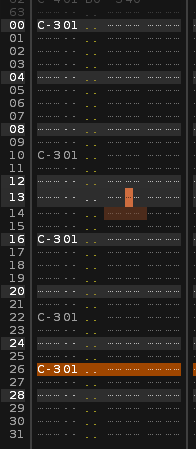
If you push ESC key, a red outline will come over your sequencer and you can punch notes into the sequencer, once they are added, push ESC again and you will be able to move around and preview samples with the keys without adding notes to your sequence.
We want to drop a sample in on 00 and 16 so..
Push ESC (red outline will appear) Q Key for C-400 on Step 00 and step 16, push ESC again (remove the red outline), push space bar to play and it will play our sequence with our break playing in full, twice through.
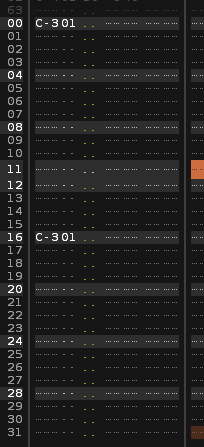
We want to add new hits in here, you can copy this pattern, your break will re-trigger from the first kick or the start of the sample with each sequencer note.
It’s already sounding cool.
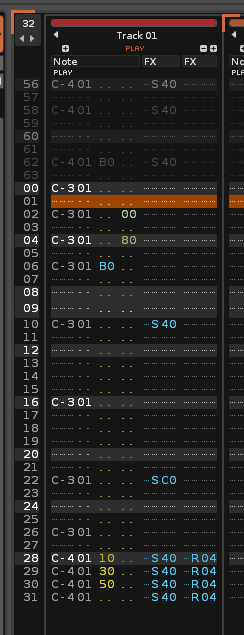
Lets add some Snares
With a break or sample which is 1 bar long and our sample synced, our snares will trigger with the commands S40 and SC0.
If your sample is longer these will change, you can find the slices within the sample window, for simplicity sake, using a 1 bar / 16 step long break is going to be an easy and simple start.
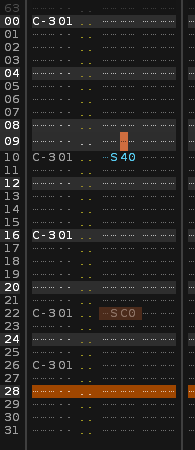
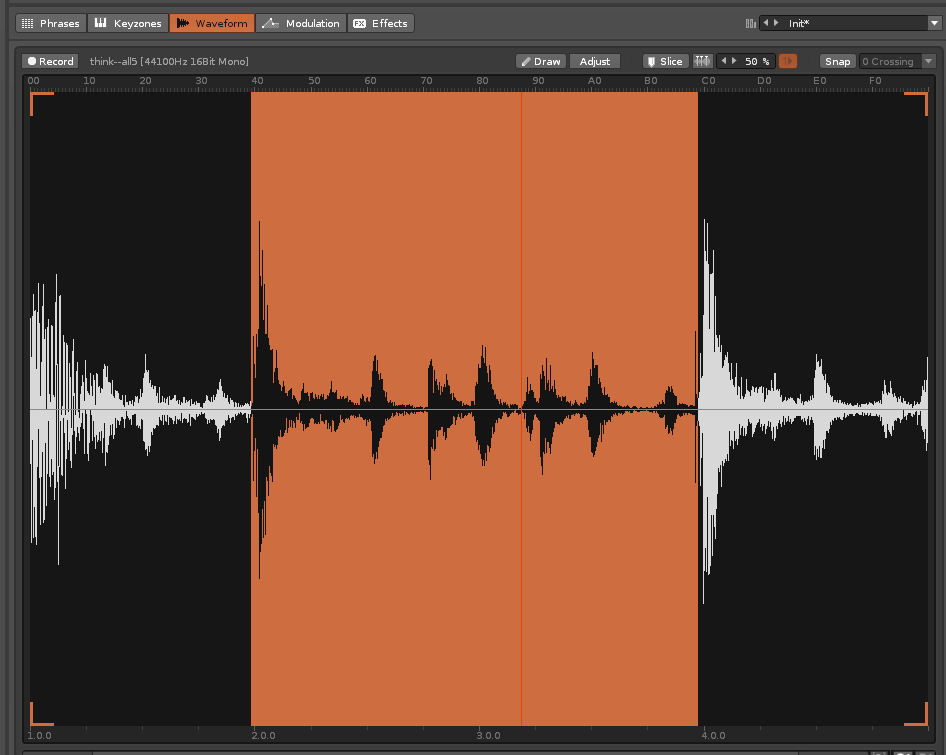
You can see the Slice Marker reading 40 where the first snare hits (I’ve highlighted this section from the first snare to the second snare) and C0 where the second snare hits.
The Effect Commands
The S command here re-triggers your sample with the slice markers, this is one of many commands which can be used.
Renoise have a page on their website with the rundown of all the commands
You can follow the link to check them all out, it’s worth saving this page for reference. When I am using Renoise, I have it open pretty much all the time.
We are just going to use a few simple commands for this break.
B0 - reverse sample playback
00-80 - Volume/velocity. 80 being full volume 0 being no volume
00-80 - Panning (needs to be in the panning column)*
0R00 - I call it a superfast Retrigger
0U00 - Pitch up
0D00 - Pitch down
Lets see them in action
*If you right click on your track, find Column, you can add the Panning Column, it may not be there by default.
I also like to click the + sign to open another line for triggering commands so we can have multiple commands going at once.
You can copy the pattern here to hear the use of these new Commands which are the Sample/slice re-trigger, panning, R00 re-triggering and the reverse sample. Super simple and basic to start but its sound complex already.
It should sound something like this
With just 32 steps there is already a cool break running.
Next I’ve added a few more variations in the re-triggering and adding adding a command to move the pitch up and down. Its worth noting the up and down and 0R00 retrigger need to have the 0 before the rest of the command
So
0U20
0U70
Will have the sample jump up 2 semitones and 7 semitones the next step.
The 0R00 commands are a bit more complicated, you can read about this on the Renoise page above but to start 0R06, 0R04, 0R02 should retrigger the snare nice and clean if you break is chopped tightly to length.
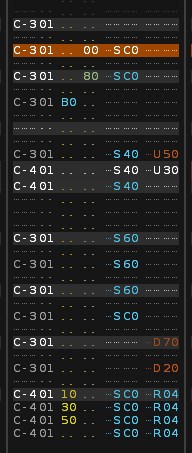
And it should sound like this.
This is the basics of one way you can chop breaks, very quickly and have it sounding pretty fucking fresh.
At this point, we’ve not even touched the sequencer, mixer and fx.
Renoise has a full mixer, a lot of the native FX are really good and usable and the sequencer is great, like the rest of the program it’s very intuitive once you are rolling.
The way I use Renoise doesn’t really utilise most of the DAW and its features, advanced users can do some wildly impressive things with it.
You can go in deep with the program, very easy to get lost in, or you can use the program as a basic sampler/sequencer to make sample based music for some fun.
As its a lightweight program, it’s easy to have it running with a million things open or you can have it on an average laptop with no need for other gear.
Sometimes I might just do drum tracks within Renoise, bounce them out to logic and finish / mix the song there, other times I might make a full track within Renoise.
This Pickleman album I made in 2016 was done with Renoise.
Most of the songs were made in Renoise and bounced out in stems and just mixed down in Logic, a few of them were 100% Renoise start to finish.
This Remix I did for Harvey Sutherland was a combo of Logic and Renoise.
I used Renoise as a sampler to take sections of the original song to start the remix, I chopped the crazy live drumming from the song in Renoise, after chopping the drums into about 10 or so sample sections to then chop/sequence before bouncing it all to Logic to finish adding new synths, samples from the song and mixing it down.
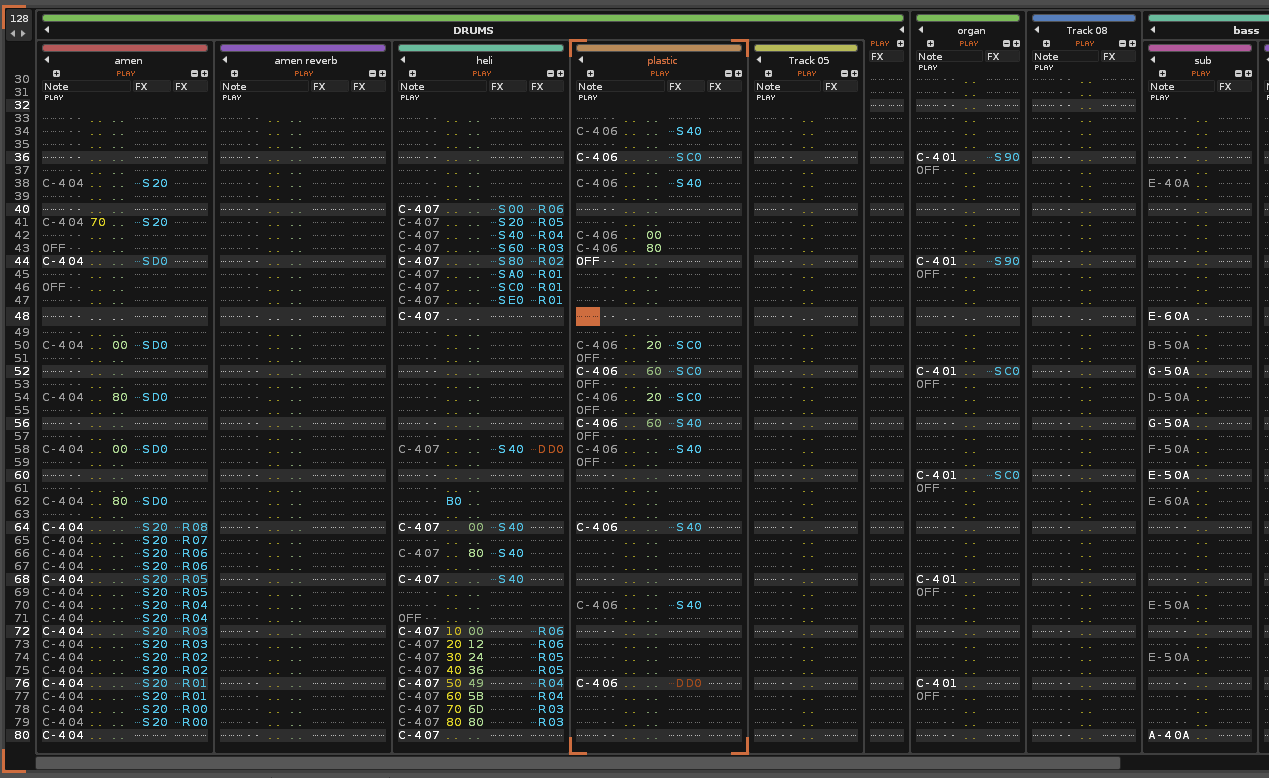
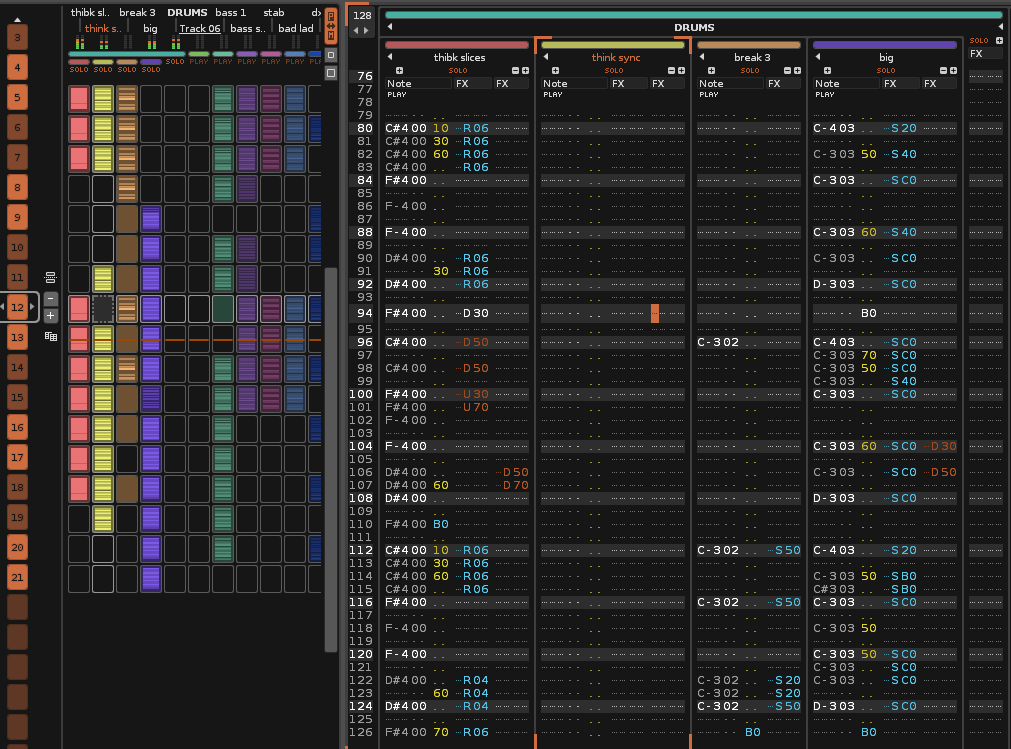
This is a screenshot of another project with the audio is below. All of the commands I used in this song are the one’s used in the tutorial above but this has four breaks going, the rest of the channels are synths, samples and bass. The audio below is just the drum group.
Hopefully this basic tutorial will be enough to get you started or excited about using a Tracker, if you have questions about any of this or if you get stuck, feel free to hit me up or leave a comment.
There are a million youtube tutorials for how to do drums in a normal DAW but I can maybe do a tutorial on how I like to do it if anyone is keen, otherwise I could look at something else production wise.
Catchya
